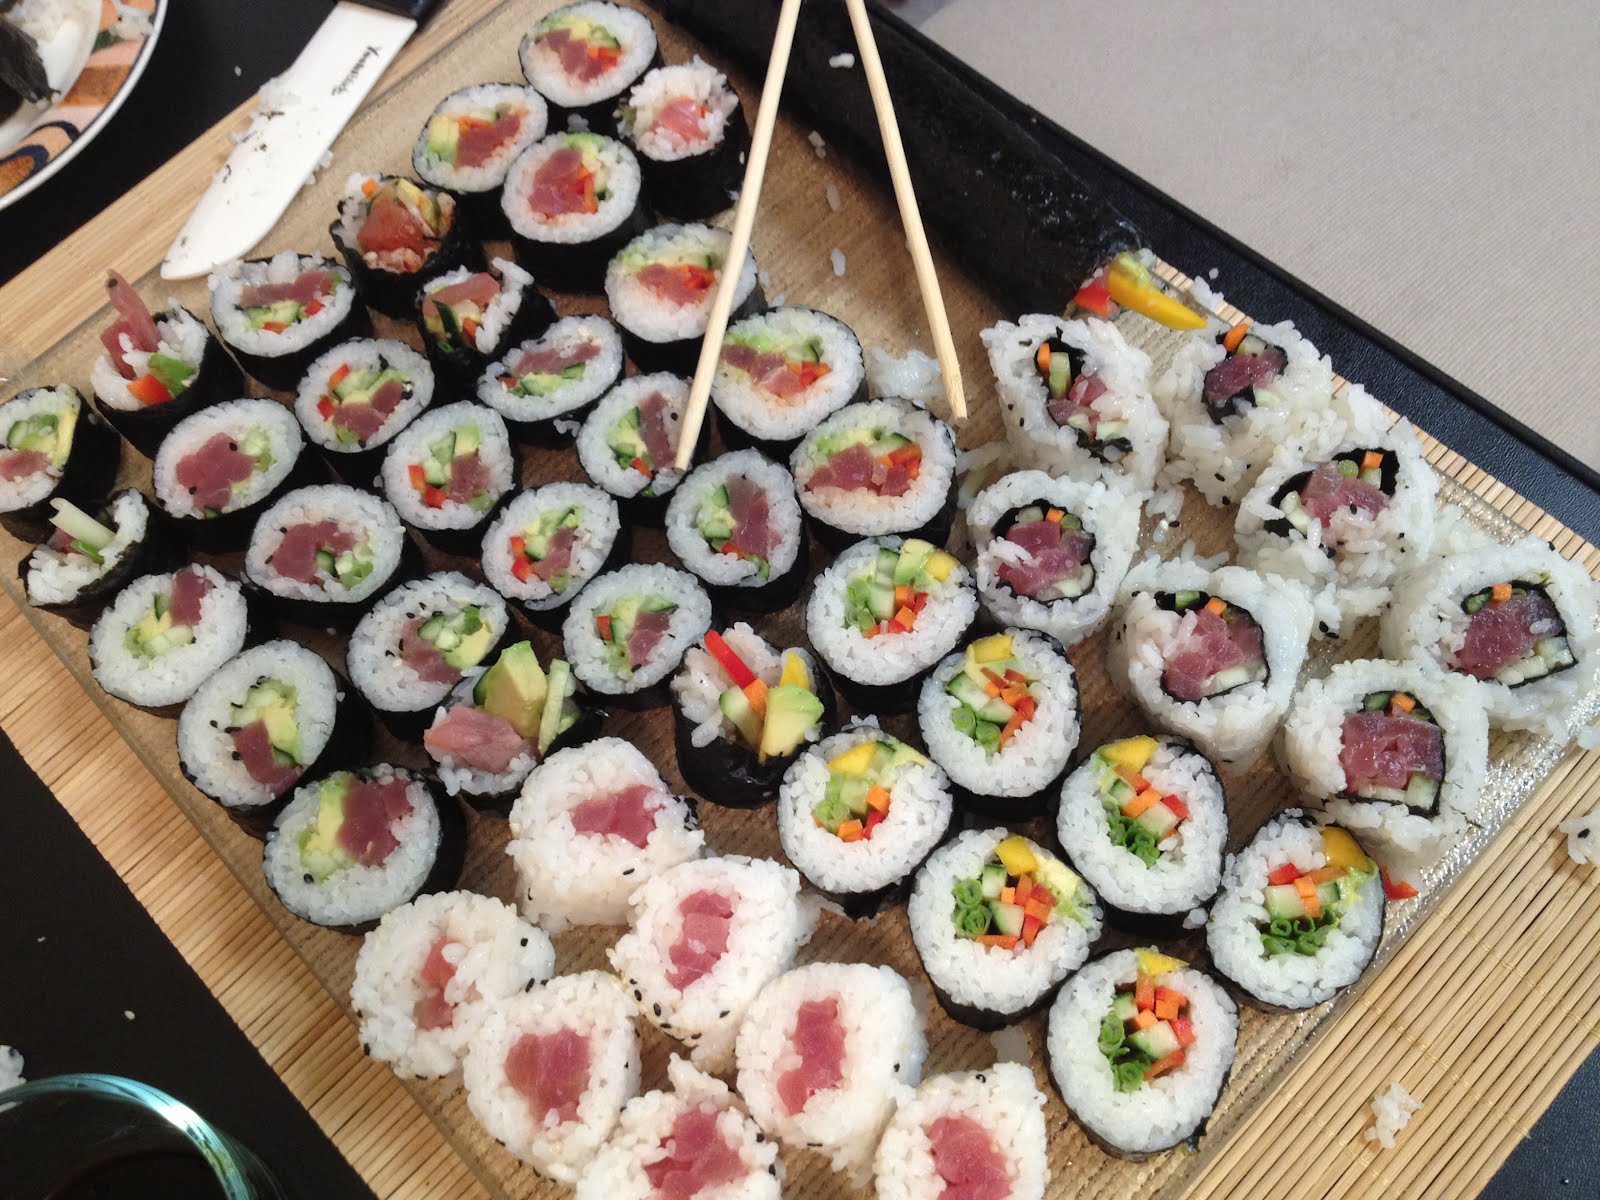
Making Your Own Sushi!


My husband and I just had a really fun afternoon! He took me out the day after Valentine's Day to a local sushi restaurant, and ever since then I have been craving it. It was the first time I had really eaten it, aside from a couple pieces in the past that I either was not impressed with or have since forgotten. But I really had fun on our date and I loved the sushi we had!

The last few days I have been telling him I wanted more, but I knew we couldn't really go out again. He surprised me yesterday by saying we should make some today! So last night we bought all our veggies, nori wrappers, sushi rice, wasabi, sesame seeds and pickled ginger! We also grabbed a couple cheap bamboo placemats for about $1.50 each. I haven't ever used a real sushi rolling mat but this worked perfectly and was cheap! He had to run an errand this afternoon and went to the fish market to get a piece of sushi-grade ahi tuna.

I cooked up the rice and seasoned it, and when he got home we sliced up all the fillings and got to rolling!


To make your own you will need:
(Approx. 3 rolls)

Bamboo sushi mat or placemat

Rice cooker (I am so happy we have one, you can cook it in a pot on the stove but it is hard to keep it from clumping. A rice cooker does it perfectly every time!)

Plastic cling wrap

1 package nori wrappers (seaweed)


1.5-2 cups Sushi rice (You really want to buy the rice that is specifically labeled as such, it has the wonderful texture and stickiness that you need for sushi rolls)


Thinly sliced vegetable/fruit fillings (We used red pepper, carrot, mango, green onion, cucumber and avocado)


1/2 lb Fish. We used Ahi tuna (You could make veggie rolls or make tamago (sweet omelette) rolls. Here is a link to a recipe for the sweet omelette.)
On a couple of the rolls we made we rubbed cayenne pepper on the tuna strips to make spicy tuna! It gave it an extra kick!


Thinly sliced cream cheese (Optional. We didn't use any this time)

Rice vinegar (2 T for rice, additional 2 T mixed with 1 c water for assembly)

Salt (1 tsp)

Sugar (1 T)

Sesame seeds, black and white (optional)

For Dipping:

soy sauce

wasabi

pickled ginger


We also made a few other sauces for dipping, my favorite was a mixture of sriracha, plain yogurt, mayo and a little lime juice.


Prep all of your ingredients before you begin so you can have fun assembling your sushi rolls!

Rice: Rinse and drain the rice under cold water 5-7 times until the water is clear. Then cook the rice according to your rice cooker’s instructions.

While it cooks, prepare the rice seasoning mixture. In a small bowl, stir together the rice vinegar, sugar and salt, and microwave for 1 minute. Stir and allow to cool for a few minutes.

Once the rice is cooked, remove it from the rice cooker and spread it out on a cookie sheet covered in plastic wrap and drizzle with the rice seasoning mixture. Then cover it with a damp towel and let it cool until the rice is room-temperature. It doesn't take very long once it is spread out. Here is the seasoned rice!


Filling: The filling is the fun part! Choose whatever filling ingredients you’d like, and just basically cut everything into long, small strips. When cutting filets of meat or seafood, just be sure to cut against the grain. We kept our fish strips on ice to keep them cold.


Dipping Sauce: Combine soy sauce, and then whisk in (or use your chopsticks to blend in) as much or as little wasabi as you’d like. (Always start with less and add more, if you’ve never used wasabi!)

Bamboo Mat: Finally, prepare your bamboo mat. Basically, you just need to completely wrap it in plastic (Saran) wrap. This helps the rice not stick to the mat during the assembly/rolling process.


Assembly: The best part! For sushi rolls, you can either make them with the rice on the inside (considerably easier) or on the outside.

To begin, lay out a piece of nori on your plastic-wrapped bamboo mat. Then have a bowl with the water and rice vinegar sitting nearby. Dip your fingers in the water/vinegar mixture (this helps the rice not stick to your fingers), and then pick up a small handful of rice and gently press it onto the nori. The goal is to spread out the rice so that it’s uniformly thin and that it extends clear to the edges of the nori. We left room on one third so that our rolls would seal well. If you’re making rolls with rice on the inside, be sure to leave an extra centimeter on the bottom edge of the nori uncovered, so that you can seal the roll at the end.


We found that dipping your fingers in the water/vinegar mixture constantly made sure the rice stuck to the nori and not our fingers!

For rolls with rice on the inside: Go ahead and layer your sliced filling ingredients along the top of the nori, on top of the rice. Try to lay out the ingredients as close together as possible.


For rolls with rice on the outside: Carefully flip over the rice/nori sheet, and gently press down to compress the rice. Then layer the sliced filling ingredients at the top of the nori as mentioned above.

We also made a one that didn't have any nori, just rice and fish, and it held together very well.


The idea is to use your bamboo mat to help roll the sushi tightly, rather than just picking up the nori to roll it with your fingers. So, very carefully, lift up the mat underneath the top of the nori (where your filling is), and begin to roll it over, making sure that the initial edge gets tucked under before rolling out the entire thing.


We used the plastic wrap to pull the roll tight under the bamboo mat as we rolled. Again, the goal is to try and roll it as tightly and evenly as possible. If you need to back up and re-roll to make it a little tighter, go for it!


Once you finish, I generally give the sushi a few more gentle rolls with the bamboo mat to make sure it’s nice and evenly-round. (And if you’re doing rolls with rice on the inside, just add a little water to the nori in order to seal the roll.) You can then sprinkle some sesame seeds on the outside of the roll (if rice is on the outside), and then give it another roll with the bamboo mat to seal them on.


Then take a very sharp knife and cut the rolls into your desired thickness of bites. Since the rice often sticks to the knife it is helpful to have a wet towel nearby to wipe off the knife blade after every 1-2 cuts. It is also helpful to refrigerate the rolls for 10-15 minutes before cutting them into bites, so that the ingredients can set and the nori becomes moist and seals completely.


Enjoy your sushi with soy sauce, wasabi and pickled ginger!


German Apple Oven Pancake


This was a really tasty and fairly quick breakfast. Originally I had planned on making regular pancakes, but then I found this recipe and decided it would be tasty!

My husband and I both loved it, and it was really tasty served with some smoked beef sausage and drizzled with maple syrup.

German Apple Oven Pancake

1/2 cup all-purpose flour
1 tablespoon sugar
1/2 teaspoon salt
2/3 cup half-and-half
2 large eggs
1 teaspoon vanilla extract
1 tablespoon unsalted butter
3 medium granny smith apples, peeled, cored, quartered, and sliced 1/4-inch thick
1/4 cup packed light brown sugar
1/4 teaspoon ground cinnamon

powdered sugar for dusting

Adjust an oven rack to the upper-middle position and heat the oven to 500 degrees F. Allow the oven to heat for at least 15 minutes before baking the pancake. In a blender or food processor, blend the eggs, sugar, half and half, vanilla and salt for about 15 seconds. Add the flour and blend until the mixture is smooth with no lumps, about 25 seconds.

Melt the butter in a 10-inch ovenproof nonstick skillet over medium-high heat. Add the apples, brown sugar, and cinnamon and cook, stirring often, until the apples are golden brown, about 8 minutes.


Quickly pour the batter around the edge of the skillet first, then over the apples.


Place the skillet in the oven and immediately reduce the oven temperature to 425 degrees F. Bake until the pancake is brown and has risen about the edges of the skillet, about 16 to 17 minutes.


Loosen the pancake edges from the hot skillet with a heat-proof spatula and flip the pancake onto a large plate or serving platter. Dust with powdered sugar, cut into wedges, and serve immediately.


Recipe from the cookbook The New Best Recipe.

20 Minute Mini Cinnamon Rolls with Maple Glaze


As most of you know, I LOVE Pinterest. I could spend all day pinning and looking at all the pretty pictures and feeling inspired! This is another cinnamon roll recipe that I found there, but since the last one was quite time consuming, this one is super quick. It's another fun way to use up a tube of crescent roll dough!

Mini Cinnamon Rolls with Maple Icing

Makes 16 mini cinnamon rolls

Ingredients:

1-8oz tube crescent roll dough

2 Tablespoons butter

cinnamon

brown sugar

sugar

For the maple icing:

1 teaspoon maple syrup

1 Tablespoon skim milk

3/4 cup powdered sugar

Directions:

Preheat oven according to crescent roll dough package directions. Layout half the dough (4 triangles) and pinch all the seams together. Flip over and pinch the seams on the back side together too.


Using a rolling pin, smooth the seams and roll the dough into a square about 1/4″ thick.


Brush with half the butter, and sprinkle with as much cinnamon and brown sugar as you want.


Roll into a log and cut into 8 pieces using dental floss. It makes it super easy!


Place mini cinnamon rolls into a non-stick sprayed mini muffin tin. Repeat steps 1 and 2 with the other half of the crescent roll dough. Bake according to package directions.


Meanwhile whisk together maple syrup and milk in a bowl. Add in powdered sugar until desired consistency is reached. (I did this in the bowl with the extra butter leftover from when I brushed it on the dough. This made the icing more of a glaze than an icing, which I really preferred.)


Drizzle over warm cinnamon rolls.


Now try not to eat them all at once!

Recipe adapted from here.


Orange Marmalade Cinnamon Rolls


This recipe is from The Pioneer Woman's website, and so instead of copying and pasting it here I will just link to her page and post my pictures. I can't make my blog prettier than hers, lol. Ree is amazing and if you haven't checked out her blogs, recipes, cookbooks or TV show, you should!

Orange Marmalade Rolls


The one thing I did differently is I used a mixture of white and brown sugars mixed with cinnamon. I still really wanted cinnamon!

I spread some marmalade my mom made on the dough.


Sprinkled the sugars and cinnamon on...


Rolled it up and sliced the rolls off the log with dental floss. It's so quick and easy for cutting dough and it doesn't smash the dough like a knife can if it isn't sharp enough. Here they are in the pan. I put them in the fridge overnight and the next morning I let them rise of the stove for about half an hour while the oven preheated and I took care of the little one.


Then here they are right before I put them in the oven!


Here they are hot out of the oven!


And finally, with the lovely icing soaking into all the cracks! (I got too excited and didn't whisk the icing enough so there were a couple lumps in it. It was still super yummy!!)


Soooo good!!

Beef Stroganoff


This is a really tasty beef stroganoff recipe. It originally called for white wine, but we used red and I think it was very yummy! The meat was nice and tender. I am not a fan of tough bits of meat that you have to chew, and chew and CHEW but the marinating step eliminates that!

Beef Stroganoff
(recipe adapted from Cooks Illustrated)

1 1/4 lbs sirloin steaks, or tips ( trimmed of excess fat and cut lengthwise with grain into 4 equal pieces)
2 teaspoons soy sauce
1 lb white mushrooms, quartered
2 teaspoons hot water
1 tablespoon dry mustard
1 teaspoon sugar
fresh ground black pepper
1 tablespoon vegetable oil
1 medium onions, finely chopped
table salt
2 teaspoons tomato paste
4 teaspoons unbleached all-purpose flour
1/3 cup plus 1 tbsp. red wine
1 1/2 cups beef broth
1/2 cup sour cream
1 tablespoon chopped fresh parsley leaves (optional, for garnish)

Using fork, poke each piece of steak 10-12 times. Place in baking dish; rub both sides evenly with soy sauce. Cover with plastic wrap and refrigerate at least 15 minutes or up to 1 hour.(I put my meat in the soy sauce and then we went to the store. It was nice and tender by the time we got home!)

While meat marinates, combine water, dry mustard, sugar, and 1/2 tsp pepper in a small bowl until smooth paste forms; set aside.

Pat steak pieces dry with paper towels and season with pepper. Heat oil in 12" skillet over medium-high heat until just smoking. Place steak pieces in skillet and cook until browned on all sides and internal temperature registers 125 to 130 degrees, 6-9 minutes, reducing heat if fond begins to burn. Transfer meat to large plate and set aside while cooking sauce.


The original recipe calls for microwaving the mushrooms before adding them, but I thought that was strange. So I sauteed them in the pan with the onions. Add mushrooms, onion, and 1/2 tsp salt to skillet and cook until vegetables begin to brown and dark bits form on bottom of pan, 6-8 minutes.


Add tomato paste and flour and cook, stirring constantly, until onions and mushrooms are coated, about 1 minute. Stir in 1/3 cup wine, beef broth and mustard paste and bring to simmer, scraping bottom of pan with wooden pan to loosen browned bits. Reduce heat to medium and cook until sauce has reduced slightly and begun to thicken, 4-6 minutes.


While sauce is reducing, cut steak pieces across grain into 1/4" thick slices (my meat was already in pieces.) Stir in meat and any accumulated juices into thickened sauce and cook until beef has warmed through, 1-2 minutes. Remove pan from heat and let any bubbles subside. Stir in sour cream and remaining tablespoons wine; season to taste with salt and pepper.


Sprinkle with parsley to garnish. Serve over hot egg noodles.

We also had a tasty green salad with our dinner.


Enjoy!